Wednesday, December 31, 2008
Download MCA, DOEACC and BE/BTECH projects
We have recently launched a website called http://www.liveprojects.in/ . This site is dedicated to students. You can download MCA, DOEACC and BE/BTECH projects here. Contribute projects here and help your joiners in completing their term end projects
Monday, December 29, 2008
Crack Microsoft Excel Sheet Protection Password
This routine provides a password to unprotect your worksheet. However, it may not give you the original password that was used.
Open the workbook that has the protected sheet in it. Hit Alt+F11 to view the Visual Basic Editor. Hit Insert-Module and paste this code into the right-hand code window:
Sub PasswordBreaker()
'Author unknown but submitted by brettdj of www.experts-exchange.com
Dim i As Integer, j As Integer, k As Integer
Dim l As Integer, m As Integer, n As Integer
Dim i1 As Integer, i2 As Integer, i3 As Integer
Dim i4 As Integer, i5 As Integer, i6 As Integer
On Error Resume Next
For i = 65 To 66: For j = 65 To 66: For k = 65 To 66
For l = 65 To 66: For m = 65 To 66: For i1 = 65 To 66
For i2 = 65 To 66: For i3 = 65 To 66: For i4 = 65 To 66
For i5 = 65 To 66: For i6 = 65 To 66: For n = 32 To 126
ActiveSheet.Unprotect Chr(i) & Chr(j) & Chr(k) & _
Chr(l) & Chr(m) & Chr(i1) & Chr(i2) & Chr(i3) & _
Chr(i4) & Chr(i5) & Chr(i6) & Chr(n)
If ActiveSheet.ProtectContents = False Then
MsgBox "One usable password is " & Chr(i) & Chr(j) & _
Chr(k) & Chr(l) & Chr(m) & Chr(i1) & Chr(i2) & _
Chr(i3) & Chr(i4) & Chr(i5) & Chr(i6) & Chr(n)
ActiveWorkbook.Sheets(1).Select
Range("a1").FormulaR1C1 = Chr(i) & Chr(j) & _
Chr(k) & Chr(l) & Chr(m) & Chr(i1) & Chr(i2) & _
Chr(i3) & Chr(i4) & Chr(i5) & Chr(i6) & Chr(n)
Exit Sub
End If
Next: Next: Next: Next: Next: Next
Next: Next: Next: Next: Next: Next
End Sub
Close the VB Editor window. Navigate to the worksheet you want to unprotect. Hit Tools-Macro-Macros and double-click PasswordBreaker in the list.
Saturday, December 27, 2008
How to completely remove a printer
1. Remove the printer from Print Manager
2. Delete the printer Drivers located in
winnt\system32\spool\drivers\w32x86\1
3. Edit the registry and delete the driver references at the following
location:
Hkey_Local_Machine\System\CurrentControlSet\Control
\Print\Environments\WIndows NT x86\Drivers\Version-1
4. Restart the computer
5. Recreate the printer in Print Manager
Source: http://www.nthelp.com/351/removeap.htm
Thursday, September 4, 2008
Removing Grub or Windows Vista Bootloader
Removing Dual Boot Linux or Vista with is tricky because of their Bootloders. Many times I receive SOS message regarding it.
Situation: You have installed Linux or Vista with windows XP and letter need to uninstall it. Or (in most of case) you already formatted that VISTA/Linux partition and unable to Boot XP.
What You Need: Bootable XP CD
Boot Computer from CD Driver (Make CD Driver first bootable device of use BIOS boot menu)
When your computer start from XP CD it will prompt for Pres any Key to Boot from CD .., Press Enter

After some time you will see a screen similar to this
 Press R
Wait for some time until you see a screen similar to this

If it is asking for “Which windows installation you want to log?” provide 1/2/3 according to shown in list above (if not sure type 1) and press enter. Now you have to type your Administrator Password to be able to use the Recovery Console. If forgotten than you can try these steps with Windows 2000 bootable CD instead for XP. Read this article to break XP Administrator password: http://tec-articles.blogspot.com/2007/11/forgot-windows-xp-administrator.html
Now you can see a typical DOS command
Type FIXMBR at command prompt, if asked for conformation press Y

Type FIXBOOT at command prompt, if asked for conformation press Y

You are done, take the Windows XP CD out of drive and restart your computer .
Tuesday, September 2, 2008
Windows 2003 terminal service Crack / Hack / Bug
In Windows 2000, Terminal Services only included a "Per Device" licensing mode.
This means if you have 5 people sharing 1 workstation and they all use TS on a server, they only require 1 TS CAL. However in today's world of throw away computers and telecommuting, the reality is most companies will have more than 1 "device" (computer) per employee. This means for 1 power user you may have to supply 2 or 3 TS CALs. This obviously isnt fair. Microsoft made up for this partly in 2000 by letting 2000 Pro or XP Pro machines connect to a 2000 TS Server effectively for free. TS CALs for these devices come from an unlimited pool on the TS Licensing Server automatically.
Microsoft was pressured in Windows 2003 to introduce a Per User licensing mode as it was expected that an XP Client license would no longer include a TS CAL. This would allow 1 Power User to use as many PCs as they wanted while consuming only 1 TS CAL. Since companies now have to pay for EVERY TS CAL in 2003, this made alot more sense.
Well with all the feature updates in 2003 Server, someone forgot to "finish" the Licensing Code for Per User. (In theory all they had to do was assign a CAL to the user's SID, but in workgroups this may not work as expected, so who knows).
Well rather than pulling the (expected) Per User licensing mode, Microsoft released it in such a way that it barely works.
In a Per Device mode, the TS Licensing server has to have 2 things.
1) Needs to be "Activated" (This registers the TS Lic server with MS, but its totally free)
2) Needs to have Per Device TS CALs added to the Licensing Server
However, in Per USer mode, the TS Licensing server only needs #1.
What? You dont beleive me? Check this URL:
- http://www.microsoft.com/windowsserver2003/techinfo/overview/termservlic.mspx
- Download and open the 2003 TS Licensing Whitepaper.
- Look in the section called "Client License Distribution Per User"
- Notice that section is VERY short and read the first sentence as its specifically says "must be able to locate a license server" as the only requirement.
The caveat to this is 2003 defaults to Per Device mode and needs to be changed to Per User mode in order use (exploit) this feature (bug).
To change your licensing Mode:
- Launch Terminal Server Configuration from Administrative Tools.
- Select Server Options on the left
- Double Click Licensing Mode on the right. Change the mode to Per User and then reboot.
NOTE: If you are adding TS and your source disk was 2003 with SP1 integrated, you will actually be prompted for your licensing mode and licensing server discovery method during the install. This makes it alot easier.
Something not documented very well in the white paper is also the easiest way to point your TS Server at a specific Licensing server. If you don't have TS Licensing setup in AD properly and your TS Licensing server is NOT on the same subnet as the Licensing server, this is the fastest and easiest way to force the TS Server to see the Licensing Server.
Add a Registry key (not a Reg Entry but a Key (looks like a folder)) like the following.
You will probably need to add the LicenseServers key as well.
HKEY_LOCAL_MACHINE\SYSTEM\CurrentControlSet\Services\TermService\Parameters\LicenseServers\LICSERVERNAME
Where LICSERVERNAME is the name of your License Server. It can also be the IP or FQDN of the License Server if need be. This KB Article explains it:
http://support.microsoft.com/kb/279561
Just keep in mind that if you do this at your company, and you ever get audited by MS and they find you dont have any Per User TS CALs at least purchased, your going to be in some serious trouble. The funny part is they dont have an easy way to tell how many your supposed to have purchased anyway because the licensing is broken and cant track valid licesnes properly anyway.
I personally found this all out because I put 1000 Per User TS CALs on my Licensing Server my company purchased. Several months later after I pointed 30+ TS Servers at this license server (all in Per User Mode of course), I was surprised to find it said I had Zero issued and 1000 still available. I opened a case with MS where they embarrassingly explained to me this glitch.
Well thats it, enjoy your free 2003 TS Licenses.
Source: Google/Torrents
Tuesday, June 24, 2008
How to Remove Hyperlinks from a Word Document
When you copy and pest some matter from web site to a word document it keeps hyperlinks from original web site by default. These blue underlines look very annoying when printed. So if you want to remove hyperlinks from your word document here is a shortcut:-
1. Select whole document by pressing CTRL and A together.
2. Now hold CTRL and Shift and press F9.
All Hyperlinks from you document is gone now!
1. Select whole document by pressing CTRL and A together.
2. Now hold CTRL and Shift and press F9.
All Hyperlinks from you document is gone now!
Saturday, June 21, 2008
How to configure the TCP/IP protocol through registry
 How can you change IP address of a remote computer? Well the easiest way is to run regedit, open file menu and click “Connect to remote registry”. Now navigate to appropriate key and change TCP/IP configuration as shown below-
[HKEY_LOCAL_MACHINE\SYSTEM\Current Control Set\
Services\Tcpip\Parameters\Interfaces\{
"IPAddress"=REG_MULTI_SZ:"
[HKEY_LOCAL_MACHINE\SYSTEM\Current Control Set\Services\
Tcpip\Parameters\ Interfaces\{
"SubnetMask"=REG_MULTI_SZ:"
[HKEY_LOCAL_MACHINE\SYSTEM\Current Control Set\Services\
Tcpip\Parameters\ Interfaces\{
"DefaultGateway"=REG_MULTI_SZ:"

Now you have to restart the remote commuter to make the configuration changes effective. To restart remote computer open computer management, right click on “Computer Management (Local)” => “Connect to another computer…” => type the name of another computer => Click OK. Now right click on “Computer management” choose “Properties”


Click on advance TAB => click on “Startup and recovery” Setting button. In “Startup and Recovery” dialog box click on “Shutdown” button now choose restart from action radio and specify force application close behavior (if some one is working on that system than you should choose “never” to prevent data loss. If you want to restart immediately than choose “Always” click on. Wait for some time the remote system will be restarting…

Thursday, June 12, 2008
How to delete or cancel hung print jobs in Windows
How to clear the print queue in Windows when all the jobs get “stuck” and none of the jobs can be deleted.
It's easy enough to cancel a print job in the queue - you simply right-click it and select "cancel," after which the print job status commences to display "deleting..." After which you normally expect the print job to cancel and disappear so you can resume printing, correct? Unfortunately, often the print job will hang and prevent you from continuing to print anew from that same printer.
How to forcefully delete print job
1. Go to Start, Control Panel and Administrative Tools. Double click on Services icon.
2. Scroll down to the Print Spooler service and right click on it and select Stop. In order to do this, you need to be logged in as Administrator. At this point, no one will be able to print anything on any of the printers that are being hosted on this server.
3. Next you need to go to the following directory: C:\WINDOWS\System32\spool\PRINTERS. Delete all the files in this folder. This will clear all print queues (it’s a good idea to first make sure there are no other print jobs being processed on any of the other printers on the server because doing this step will delete those jobs also)
4. Now you can go back to the Services console and right-click and choose Start for the Print Spooler service.
You can also go to a command prompt and type net stop spooler or net start spooler to start and stop the service.
Source: http://community.contractwebdevelopment.com/how-delete-or-cancel-hung-print-jobs-windows
Friday, February 8, 2008
A quota scan on directory "\[DIR]" on volume "\Device\VSPSnapshot0 (N/A)" failed unexpectedly
Source: Quota
Event ID: 12
The quota minifilter driver completed rescanning directories under quota management on volume "\Device\VSPSnapshot0 (N/A)". Some directories under quota management could not be scanned.
Source: Quota
Event ID: 11
A quota scan on directory "\[dir]" on volume "\Device\VSPSnapshot0 (N/A)" failed unexpectedly. Error code: 0xc0000010 The quota usage for the quota on this directory and any parent directories may be incorrect. The affected quotas may not be properly enforced. You can attempt to initiate a new scan using the quota management command line tool. If the problem persists, reboot your system.
Since we have implemented File Server Resource Manager on our new Windows 2003 r2 server we are getting these cryptic errors every day. After lot of goggling I have found only these links
Today suddenly after comparing it daily occurrence I got reason behind it. In our scenario this error is logged everyday between 4 to 5 am which is time of File server backup (which is dome through Symantec Backup Exec). This happen because at the time of backup disk is too busy to respond to quota scan service.
Event ID: 12
The quota minifilter driver completed rescanning directories under quota management on volume "\Device\VSPSnapshot0 (N/A)". Some directories under quota management could not be scanned.
Source: Quota
Event ID: 11
A quota scan on directory "\[dir]" on volume "\Device\VSPSnapshot0 (N/A)" failed unexpectedly. Error code: 0xc0000010 The quota usage for the quota on this directory and any parent directories may be incorrect. The affected quotas may not be properly enforced. You can attempt to initiate a new scan using the quota management command line tool. If the problem persists, reboot your system.
Source: Quota
Event ID: 11
A quota scan on directory "\[dir]" on volume "\Device\VSPSnapshot0 (N/A)" failed unexpectedly. Error code: 0xc0000010 The quota usage for the quota on this directory and any parent directories may be incorrect. The affected quotas may not be properly enforced. You can attempt to initiate a new scan using the quota management command line tool. If the problem persists, reboot your system.
Since we have implemented File Server Resource Manager on our new Windows 2003 r2 server we are getting these cryptic errors every day. After lot of goggling I have found only these links
- http://forums.techarena.in/showthread.php?t=666096
- http://www.tech-archive.net/Archive/Windows/
- http://www.eventid.net/display.asp?eventid=11
Today suddenly after comparing it daily occurrence I got reason behind it. In our scenario this error is logged everyday between 4 to 5 am which is time of File server backup (which is dome through Symantec Backup Exec). This happen because at the time of backup disk is too busy to respond to quota scan service.
Monday, January 21, 2008
Migrate from SBS 2003 to 2003 Standard (Without Transition Pack)
Migrating from SBS 2003 SP1 to 2003 Standard R2
Jenny Wu
Microsoft CSS Online Newsgroup Support
Taken From:http://groups.google.co.in/group/microsoft.public.windows.server.sbs/
If you don't want to buy Transition Pack, you can setup a new Windows 2003 server in the SBS domain and set it as additional DC. And then use FSMO role transfer method to transfer all the roles from SBS 2k3 server to Windows 2003. Migrate all AD information, user profile, database and service such as DNS and DHCP you need from the server.
For the share folder information, you could just use copy command. For the Exchange information, you could use Exchange Migration wizard or use Exmerge utility. For the client workstation, you need to update the Exchange server location.You can refer to the following KB article to do it:
328871, "How to: Use the Exchange Migration Wizard to Migrate Mailboxes from an Exchange Organization" at the Microsoft Web site http://support.microsoft.com/?id=328871To move SQL server database: you can follow the instructions in the article:
How to: Move Databases Between Computers That Are Running SQL Server http://support.microsoft.com/?id=20167
If you want to move other information, I suggest that you view the Microsoft white paper to get info: Migrating from Small Business Server 2000 or Windows 2000 Server to Windows Small Business Server 2003 http://www.microsoft.com/downloads/details.aspx?familyid=FA187D1E-821...9729-222BD8EBB64C&displaylang=enI would like to list the detail steps to upgrade SBS 2003 to Windows 2003 server:
0. Start the installation of Windows 2003 on a new hardware. Once the operating system is installed, the server will reboot.a. On the Windows 2003, configure a static IP on the LAN network card and make sure to point DNS to the old SBS server hosting active directory zone.
b. Run DCPROMO on the new Windows 2003 server to join it into the existing domain, do not create a new forest, and do not create a child domain. Install DNS, do not change any DNS settings yet.
1. Set the New Server as GC (Global Catalog Server). To set a DC as a GC, you can follow the steps in the following MS Knowledge Base article:
816105 HOW TO: Create or Move a Global Catalog in Windows Server 2003 http://support.microsoft.com/?id=816105
2. Remove Exchange attributes (not mailbox) from all users by choose the Exchange Task in "Active Directory Users and Computers". If you find that you only have the three items (Delete Mailbox, Move Mailbox and Enable Instant messages.), you can just ignore them. This step is only to make sure to remove all other attributes you have configured for users.
3. Stop DHCP on SBS 2003, install DNS (make it AD Integrated so that it will replicate all DNS information from the SBS server) and DHCP on the new Windows Server 2003 server and then configure the DHCP scope the same as SBS 2003.
4. Configure the new server to point to itself for DNS. Configure all the client computers to point to the new server as DNS. If you are using DHCP to issue DNS server settings, you should configure your new DHCP server to reflect the changes.
5. After making sure the clients can successfully log on, open Active Directory Users and Computers, connect to the new server and remove the SBS 2003 server account from the Domain Controllers container.
6. Take the old SBS server offline.
Then you can format the old server and install Windows server 2003 server. After you installed OS and join the box to domain, you can install exchange server 2003 in the box and import the mailboxes from the PST files (if you have export the mailboxesJenny Wu
Microsoft CSS Online Newsgroup Support
Taken From:http://groups.google.co.in/group/microsoft.public.windows.server.sbs/
Friday, January 18, 2008
Creating a trust relationship between two Small Business Server 2000 domains
Taken from: http://fac.ce.vreau.eu.org/sbs.html
* A backup solution (in case you mess up with something)
* A backup solution (in case you mess up with something)
* Two windows 2000 or windows 2003 servers (I have played with the trial version of windows 2003 server, but I think 2000 srv would do the job just fine)
* The 'replmon.exe' utility
* Patience (a lot ! especially if you have a slow link between the two sbs's)
Okay, let's begin (Make sure you follow the steps below for each domain ;) ) :
* Configure your SBS DNS server to allow dynamic updates (you will need this in order to add an additional dc) - I have even switched from ad-integrated mode to standard primary to avoid ad replication issues. Make sure each dns server contains a slave zone for it's partner dns zone, so one SBS can locate the other SBS
* Add each SBS WINS server as a replicating partner (so pre-windows 2000 clients will be able to locate the other domain)
* If you intend to play with w2k3, upgrade your sbs ad schema (run adprep /forestprep followed by adprep /domainprep from the i386 folder on your w2k3 cd or mapped network drive). Make sure you meet requirements for running adprep (you need to have your sbs at sp2 level or more, or have the needed patches - see http://www.petri.co.il/win2003_adprep.htm or better http://support.microsoft.com/?scid=331161). I was in sp3 and it worked fine
* Install the additional server (do not install a dns server, it will make things go slower because you will need to wait for dns replication)
* Make sure your new server is using only sbs dns as it's dns server
* Go through dcpromo
At this point you should have two domain controllers in your sbs forest
Now comes the interesting part.
As you all know, the sbs is a global catalog, and it is handling all 5 fsmo roles.
The trick is to move all the roles to your brand new additional dc, do the same within the other domain, establish the trust relationship, transfer the roles back to sbs's and demote the temporary servers.
Using ntdsutil, move all 5 fmso roles ( i know it might be only one that matters, but do not know yet wich one - I think the pdc emulator ?)
* at ntdsutil prompt, type:
roles
connections
connect to server NEW_DC (where NEW_DC is the name of the new temporary dc)
quit
transfer rid master
transfer pdc
transfer domain naming master
transfer infrastructure master
transfer schema master
quit
quit
I have also made new dc a global catalog, just to make sure I do not depend on sbs2k at all ;)
Of course there are other ways to transfer the fmso roles, but I like it this way, I come from linux world and I like typing :P
Now comes the patience part
* You have two choices. Either wait for the normally replication, or manualy initiate it. To check how each server knows about server roles, I have used the fsmo.vbs script (found at http://www.microsoft.com/technet/treeview/default.asp?url=/technet/scriptcenter/compmgmt/ScrCM24.asp). For manual replication I have used the 'replmon' utility found under \support\tools folder on the install cd and Active Directory Sites and Services mmc snap-in.
Basically, reading http://gracie.santarosa.edu/~mckeever/Active%20Directory/Reading/6%20Essential%20Tools%20for%20Troubleshooting%20AD%20Replication.htm should help you get through it.
http://www.winnetmag.com/articles/index.cfm?ArticleID=7429&pg=2 and http://www.netpro.com/forum/messageview.cfm?catid=7&threadid=42 might also be very helpful sources of information
* After you make sure that the fsmo roles have transferred to the new dc... go and create your trust as you normally would (note: do this operation on the new dc... not on sbs server!)
(For the really paranoid only: disconnect the sbs dc's from network before establishing the trust)
* Transfer back the roles to sbs
* Demote your new dc
* At this point all your MVP friends will still tell you "no, it's not possible, are you speaking about PTA ?" and eventually a Microsoft PSS will repeat saying that "Trust relatioinship is not supported in any SBS suites (SBS 4.0/4/5/2000/2003)"
But you don't care. You've just created a trust between two Small Business 2000 Servers, and yes, you see it working.
How to prepare the SBS domain for an additional R2 Domain Controller
Taken from: http://www.smallbizserver.net/tabid/266/articleType/ArticleView/articleId/221/Default.aspx
There are several reasons for needing an additional Domain Controller. As it will hold a replica of the Active Directory, the Group Policies and login scripts etcetera, it can be used to serve a remote location like a branch office. The additional DC is also used in the Swing It migration from Jeff Middleton to migrate a domain while upgrading to a newer SBS version or new hardware. It doesn't matter if you are still running SBS 2000 or SBS 2003 with or without R2, you will need to prepare the AD Forest as described in this article.
You can NOT use the SBS media for installing an additional server or Domain Controller, you will need to purchase a plain Windows 2003 server license and media. As you can only get R2, you will be looking at upgrading the Active Directory Schema, as it is different from Windows 2003 server RTM.
You will need the second R2 CD from the plain Windows 2003 R2 server media kit and use that on the SBS server. You need to login as the administrator on the server.
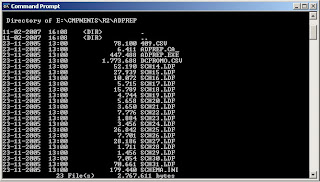
1. Open the command prompt on the SBS server and navigate to the CD drive. Then navigate to the Adprep folder with: cd CMPNENTS\R2\Adprep
2. Type the following command to prepare the Active Directory Forest: adprep /forestprep
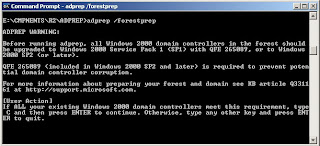
3. Assuming there are no Windows 2000 domain controllers that are not up to date with SP4, type C and press Enter:
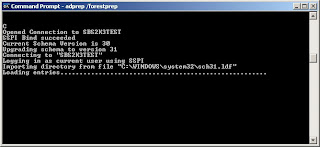
4. Depending on the SBS version, it can take 5 to 10 minutes before the command has successfully finished:
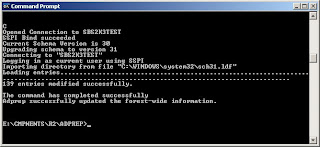
5. The Active Directory is now prepared for additional R2 domain controllers, and the Directory Service event log will show a bunch of 1137 events that were logged during the adprep operation:
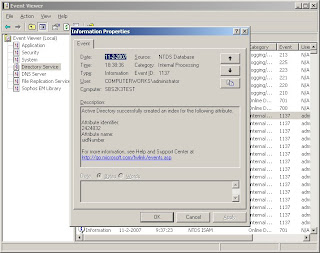
There are several reasons for needing an additional Domain Controller. As it will hold a replica of the Active Directory, the Group Policies and login scripts etcetera, it can be used to serve a remote location like a branch office. The additional DC is also used in the Swing It migration from Jeff Middleton to migrate a domain while upgrading to a newer SBS version or new hardware. It doesn't matter if you are still running SBS 2000 or SBS 2003 with or without R2, you will need to prepare the AD Forest as described in this article.
You can NOT use the SBS media for installing an additional server or Domain Controller, you will need to purchase a plain Windows 2003 server license and media. As you can only get R2, you will be looking at upgrading the Active Directory Schema, as it is different from Windows 2003 server RTM.
You will need the second R2 CD from the plain Windows 2003 R2 server media kit and use that on the SBS server. You need to login as the administrator on the server.
1. Open the command prompt on the SBS server and navigate to the CD drive. Then navigate to the Adprep folder with: cd CMPNENTS\R2\Adprep

2. Type the following command to prepare the Active Directory Forest: adprep /forestprep

3. Assuming there are no Windows 2000 domain controllers that are not up to date with SP4, type C and press Enter:

4. Depending on the SBS version, it can take 5 to 10 minutes before the command has successfully finished:

5. The Active Directory is now prepared for additional R2 domain controllers, and the Directory Service event log will show a bunch of 1137 events that were logged during the adprep operation:

If you already have other domain controllers in the network, you will need to update those with:
- adprep /domainprep
This command will be finished a lot quicker. You are now ready to add additional Domain Controllers that will be running Windows 2003 R2.
Migrate from sbs 2000 to a regular domain 2003
Yes - Yes you can migrate from sbs 2000 to a regular domain 2003 (without any transition pack)
src="http://pagead2.googlesyndication.com/pagead/show_ads.js">
Trust me it is possible and we have recently done it. The procedure is very simple. Read this article How to prepare the SBS domain for an additional R2 Domain Controller first and add addition R2 Domain Controller to your domain. This article
Creating a trust relationship between two Small Business Server 2000 domains will also help you lot.
After adding addition domain controller to your domain wait for full replication (It is nice to wait for at least 24hr, now shut your SBS domain controller down and size all roles from it. This article will help you in this process "How can I forcibly transfer(seize) some or all of the FSMO Roles from one DC to another?"
Subscribe to:
Posts (Atom)